WindowsPCからリモート接続方法
Linuxとクライアント(Windows)を遠隔操作します。
今回、SSHする為に使用するツール、Tera Termをダウンロードします。
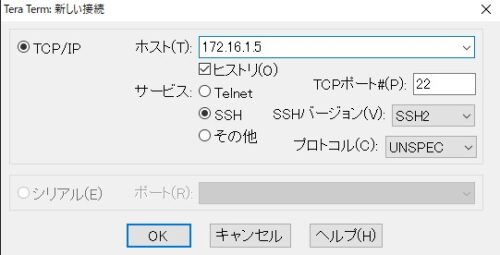
インストール完了後、Tera Termを起動します。
TCP/IP ホストに接続するマシンのIPアドレスを入れ、必要に応じてTCPポートを入力します。

OKボタンを押します。
パッケージシステムのアップデートと設定
# yum -y update
初期は多いので時間がかかる。ネット回線の速度にもよるだろう。
アップデートを自動で行う設定をする
yum-cronをインストール
# yum -y install yum-cron
yum-cronの設定
# vi /etc/yum/yum-cron.conf
noをyesに変更する(テキストでは既にyesになってるが、変更すること)
#  What kind of update to use:
# default                            = yum upgrade
# security                           = yum --security upgrade
# security-severity:Critical         = yum --sec-severity=Critical upgrade
# minimal                            = yum --bugfix update-minimal
# minimal-security                   = yum --security update-minimal
# minimal-security-severity:Critical =  --sec-severity=Critical update-minimal
update_cmd = default

# Whether a message should be emitted when updates are available,
# were downloaded, or applied.
update_messages = yes

# Whether updates should be downloaded when they are available.
download_updates = yes

# Whether updates should be applied when they are available.  Note
# that download_updates must also be yes for the update to be applied.
apply_updates = yes
パッケージの自動更新を起動
# systemctl start yum-cron
パッケージの自動更新設定を再起動
# systemctl enable yum-cron
開発ツールパッケージ群をインストール
# yum -y groupinstall base "Development tools"
SELinuxの無効化をする
# setenforce 0
無効化を確認
# getenforce
Permissiveになってれば無効化を確認したことになる(Enforcingは有効だ)
SELinuxの設定を編集
# vi /etc/sysconfig/selinux
SELINUX=enforcingをdisabledにする
# This file controls the state of SELinux on the system.
# SELINUX= can take one of these three values:
#     enforcing - SELinux security policy is enforced.
#     permissive - SELinux prints warnings instead of enforcing.
#     disabled - No SELinux policy is loaded.
SELINUX=enforcing
これでシステム起動時にSELinuxを無効化できるようになった。
nkfコマンドをインストールする
ダウンロードします。
# wget "http://sourceforge.jp/frs/redir.php?m=jaist&f=%2Fnkf%2F59912%2Fnkf-2.1.3.tar.gz" -O nkf-2.1.3.tar.gz
ファイルを解凍する
# tar zxvf nkf-2.1.3.tar.gz
解凍したファイルのディレクトリーに移動する
# cd nkf-2.1.3/
nkfをインストールする
# make && make install
nkfのディレクトリーを抜ける
# cd
先程インストールしたディレクトリーファイルを削除する
# rm -rf nkf-2.1.3
ダウンロードしたファイルも削除する
# rm -f nkf-2.1.3.tar.gz
バックアップのリンクを貼る
# ln -s /usr/local/bin/nkf /usr/bin/nkf
閲覧数 753 件
What do you think?
You must be logged in to post a comment.